SX-50 Specimen exchange

Changing the specimen is a two stage process, and utilizes an intermediate or interlock chamber between the high vacuum specimen chamber of the SX-50, and the outside world. It is important that you know how the interlock chamber works.
 
Also realize if you want to put a specimen shuttle in, it is probably the case that a shuttle has to come out. Whether you are putting something in, or taking something out of the SX's specimen chamber, the intermediate interlock chamber needs to be pumped down so that its vacuum equals that inside and the gate valve between can be opened. The figure below depicts the typical vacuum pressures for the specimen and interlock chambers under conditions for operation and specimen exchange.
 
Severals things to note ...
(1) the SX commands for achieving either condition.
(2) under operating conditions or after giving the PUMP command, the interlock will vent and give you access ...
 

Further instructions continue below the figure.

specimen exchange


The command for pumping down the interlock, i.e., exchanging a specimen with the specimen chamber and interlock is,
		SX>ARLK 	(pumps down the interlock chamber)
The command for venting the interlock, i.e., exchanging a specimen with the interlock and the outside is,
		SX>PUMP 	(vents the interlock chamber and allows for
                                 eventual EPMA operation)
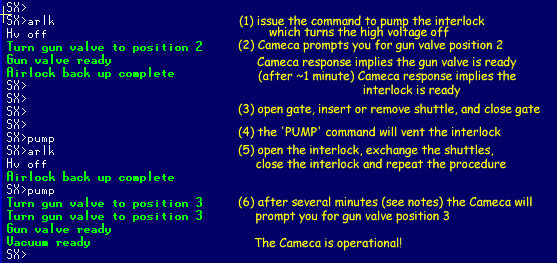
The sequence, for removing a specimen, and inserting a new specimen is represented briefly by the following dialog with the Cameca ... the steps you take are indicated with numbers ... a more detailed sequence will follow. specimen exchange dialog
The sequence, for removing a specimen and inserting a new specimen, is represented in a detailed way as follows. (... green implies you typed it followed with a carriage return [CR] ... blue is a Cameca response ...):

SX>ARLK [CR]                  (pump down the interlock)
Execute (abort=^Z) [CR]       (SX may prompt you for confirmation)
HV off                        (SX turns off high voltage)
Turn Gun Valve to position 2  (SX asks you for gun valve position 2)
Gun Valve ready               (SX acknowledges gun valve position)
Filament out                  (ignore, SX continually monitors the filament)

    ... after approximately 1 minute ...

Airlock backup complete       (the interlock is ready)
SX>

You can now access the specimen inside with the exchange device. Open the door between the inside chamber and the interlock with the black lever on the left (push in, and lift). Rotate the black collar on the access device, to indicate that you are removing a specimen, and push the access rod in until it stops. Pull it back out, close the inside chamber door (rotate, and down). At the SX prompt, type SX>PUMP [CR]                   (the interlock will vent; 15 seconds)
You now have access to the interlock from the outside. Replace your specimen with the specimen you just removed from the chamber, close the interlock access device, and type SX>ARLK [CR]                  
Execute (abort=^Z) [CR]        (SX may prompt you for confirmation)

    ... after approximately 1 minute ...

Airlock backup complete        (the interlock is ready)
Open the inner door to the specimen chamber with the black lever, rotate the black collar to indicate "in", and push the rod in until it stops and pull it out. Close the inner door, and type SX>PUMP [CR]                  

    ... after approximately 5 minutes (if longer see notes below) ...

Turn Gun Valve to position 3   (SX asks you for gun valve position 3)
Gun Valve ready                (SX acknowledges gun valve position)
Vacuum ready                   (SX is operational)


Caveats, deviations from the norm, and insight into possible problems:
The above is generally the case for, (1) having your specimen ready to exchange with the specimen inside, and (2) your specimen being dry, i.e., having outgassed for a half hour in the drying oven, or having dried overnight.
 
Regarding (1): If your specimen is not ready, the SX will eventually prompt you for Gun valve position 3 before you are ready to put your specimen in. If this happens turn the gun valve to position 3, and after Gun Valve ready, start at the beginning. Always follow the instructions given you on the terminal screen, in spite of things happening not exactly the way they had in the past.
 

Regarding (2): As (1) above implies, the command to PUMP actually tells the SX to attain operating conditions. The automatic sequence of events after giving the command, if you were to watch the vacuum display, is (1) vent the interlock, (2) open the high vacuum valve above the diffusion pump, and (3) ask for gun valve position 3 after the specimen chamber attained a vacuum of 5E-3 pascals. If your specimen is outgassing, then it is unlikely that the optimum vacuum will be attained in the time allotted (approximately 10 min). If this happens, the SX will turn off the ion pump at the gun, and will not turn it on until 2E-3 pascals. This can take quite a while. If you monitor the specimen chamber vacuum, and notice that it is having a hard time attaining something better than 6E-3, then take your specimen out and dry it. Beside the benefits of always putting in a clean and dry specimen, you will save yourself about an hour. Always dry your specimen, either overnight or with a half hour in the drying oven. 

copyrights © 1995-2002,
john donovan: March, 2002
Table of goto home page Contents